
Materials:
One Canvas. For this project I found a 10"X20" which was 7.99 at Hobby Lobby, 30% off! One Canvas = 5.59!
Crayons. I went to Target and bought 2 boxes of 64 count crayolas so that I could get several shades of green. I think it was around $4 a box. I could have found this cheaper, but I was in the mood to craft... not shop :)


Aaaaand let it sit for about 30 minutes. You know, this is the WORST time to decide this, but I'm not sure that I like the crayola labels facing out on every crayon. Oh well. That Aleene's is SERIOUS glue and you DON'T want to mess that up. What's done is done... So let's move on.
 Armed with an embossing gun... (OR you can try a hairdryer)
Oh my goodness, it's working! I mean, of course it's working! The crayon wrapper turns a little darker as the wax melts, but don't let that freak you out... and don't let it distract you!

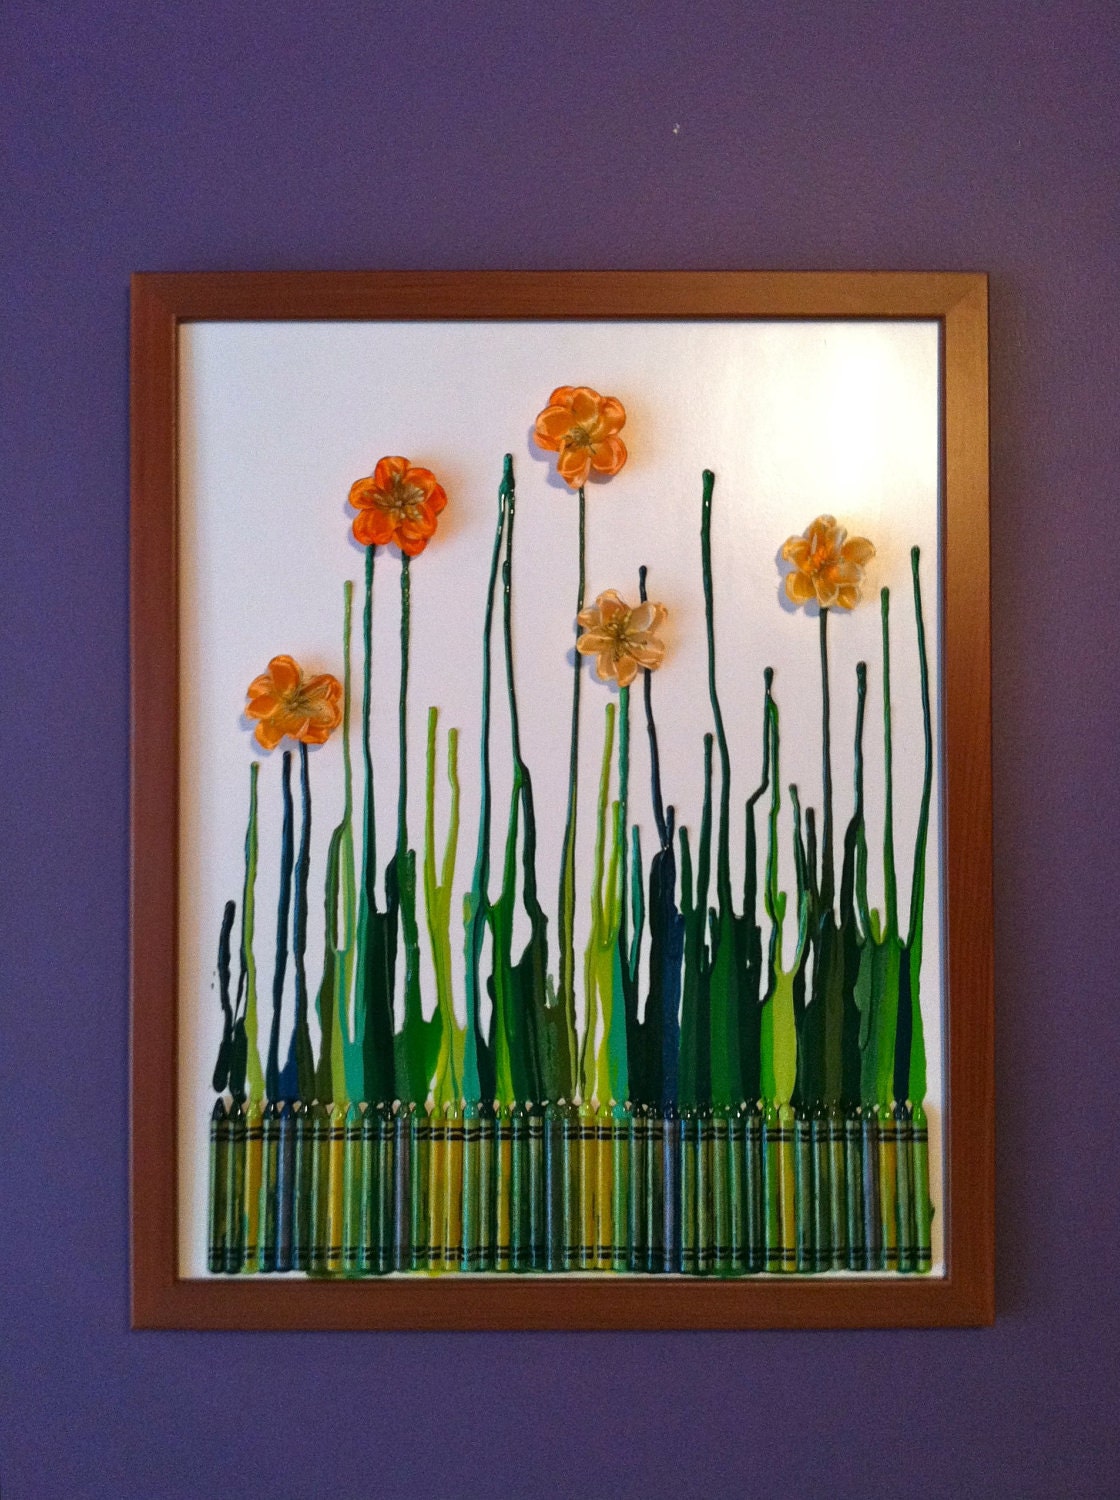
And there you go. I kept the canvas tilted at about a 15 degree angle and twisted a little bit as it dripped to get some wavy lines. Be VERY careful as you use the embossing gun or hairdryer. The liquid wax has a tendency to seriously fly all over the place. You can tell that in the finished, finished pictures below.
 Finally, the flowers. I went to Hobby Lobby for the flowers, but they closed at 3:30 because of Labor Day. Next stop: JoAnn's. Their flower selection was definitely not as good! I was hoping for some that were colorful, silk-like, with a jewel in the middle. JoAnn's had NOTHING of the sort, but I did find these Daisy heads for around $4. Peel them off, stick them on, and admire your handiwork!
  All right, folks, the damage for today's craft:
Canvas: ~ $6 (let's round up)
Crayons: ~$8
Flowers: ~$4
Aileen's Craft glue: ~$2
Whole Project: Around $2 for the one. This is another one of those crafts that get cheaper the more you make since you have left over crayons, flowers, and glue. Cheaper than JKCreate's version? I think so! Still appreciated by my Peds patients and coworkers? I think so! Happy camper? aaaaaaabsolutely.
Time: ~ 1 hour, start to finish
I suggest doing this kind of project while watching a movie or over lunch. Eat while letting the glue set, then the project feels like it only took 20 minutes.
Level of Ease: Kid + Adult
I think it's the PERFECT craft to do with kids. Adult operate the glue, kid help you pick out crayons and lay them down. Depending on the age, they might even enjoy making it melt. If you're worried, do it over cardboard or outside. It's truly mesmerizing to watch the crayons melt and meld. I can't WAIT to do it again!
YOUR TURN!
What would you change? What other colors would you use, and would you try to make scenes with it? I had the suggestion of putting a pale blue wash over the canvas with paint before melting, and I wish I would have thought about that sooner!
Happy Crafting my friends,
lindsey daniella
LOVE IT !!!
ReplyDeleteI use hot glue and it takes no time to dry. That drastically speeds up your project!
ReplyDeletei tried this with hot glue and my crayons started sliding down the canvas. i'm not sure what i did wrong? help!
DeleteI to used a glue gun, your problem might have been your glue that you used, I've had that happen in other projects but i used Rose art mini sticks and they worked GREAT!
Deletehope that helped
@Cowie, THANK YOU! And thanks so much for stopping by!
ReplyDelete@Tracy, that's brilliant! When I was planning the project out in my head I considered hot glue, but I was scared the heat gun would melt the glue and give me slippery crayons. So happy to know it works well... I don't know if I could wait for 30 minutes again while it dried. I'm already anxious to do another one. Thanks for the advice and thank you for stopping by as well!
I love that, from a distance, the crayons end up looking like a kind of picket fence - even with the labels out :)
ReplyDeleteI never thought of it that way, but now I don't see anything BUT a picket fence. I LOVE that! Thank you for changing my mind on the 'label out' view!
ReplyDeleteGlad I could help :)
ReplyDeleteWhere did you fine the embossing gun?
ReplyDeleteThanks for the inspiration! I decided to go from a different angle and used blue crayons at the top. I painted the silhouette of a girl with an umbrella and melted the "rain" all around her :) using the "flying splotches" of crayon to my benefit. Thank you for sharing the creativity and inspiring mine :)
ReplyDeleteAnon, you can find them in any craft store, usually on the rubber stamp aisle. If you have a hobby lobby nearby, use their 40% off coupon and they really don't cost that much.
ReplyDeletehttp://shop.hobbylobby.com/assets/item/regular/506345.jpg
That's a picture of what it looks like.
Aubrianne, that sounds PHENOMENAL. I would LOVE to see pictures of it. I wish I had more creativity so that I might have thought of that!
Thank you both for your comments!
After seeing this I decided I had to try it! So, off we went for our supplies and it took no time at all to make a melted rainbow. We hung ours with the crayons at the top, and we love it! Thanks for the tips! Oh! FYI - we used a blow dryer and it worked perfectly.
ReplyDeleteThanks for the idea! I've seen the same pics on Pinterest and thought "Yeah - that's neat, but what can you do with streaks of crayon down a canvas?" I love the idea of the flowers on them!! Looks so awesome!!
ReplyDeletethis is soo cool. I know my kids would want to get in on the action!
ReplyDeleteLove this!
ReplyDeleteI just made one of these after my sister in law found it on pinterest. I used shades of pink,brown, and green to match our daughters room and I had all the supplies at home!
ReplyDeleteFound your blog through pinterest:)
Great idea! Have you found that the melted wax chips off when it is cool? I'm wondering how durable it is to little fingers.
ReplyDeleteI pinned this on pinterest and am totally going to give it a try! I have tons of left over crayons after doing a crayon monogram (also from pinterest). Love!
ReplyDelete@Three Bears, SO glad the blow dryer worked well for you. And I love that you were able to put your own twist on it!
ReplyDelete@Janelle, Thank you!
@CraftinKathi, I bet they'd love it. I seriously couldn't quit giggling the entire time.
@Teresa, thanks!
@Marie, I LOVE those colors together. I bet it's beautiful. Thanks for stopping by!
@Elizabeth, for the most part it's pretty durable. I have an office in a pediatric clinic, but it's hung high enough so that they can't touch it. (Of course, that doesn't stop a few munchkins from standing on the chair when my back is turned...) Most kids are content to feel the crayons and then they're finished touching.
@Jennifer, I have seen the monograms and think they are AWESOME. Was it easy to do? Hope you can make some awesome artwork with the left overs!
Love, love, love all these ideas. I may do a class project with each kiddo using a small canvas and then put them all together. Do you think there would be enough drip space on one of those mini canvases?
ReplyDeleteYou know, I don't see why not! I was dying to let some of the wax drip off the canvas but it didn't really go with my "theme." If nothing else, only use half a crayon for each crayon.
ReplyDeleteI saw your post on pintrest and finally made my own last night! It was so much fun I'm thinking of trying a few more! Thanks for the idea!!
ReplyDeleteWhat an awesome idea!! I tried it last night and had a horrible time with the hair dryer though...it blew my melted crayon everywhere and the colors all melted together and turned brown. I would definitely try it with an embossing gun next time but overall love this idea! I hope I can make one as adorable as yours next time! Thanks!
ReplyDelete@ Karish1293, That's fantastic! So glad you enjoyed it!
ReplyDelete@Mickey Berens, I'm so sorry the blow dryer did that for you. Right about the time I read your post I heard from another friend that they had the same results with the blowdryer. I wonder if it would help to use that tip for straightening hair. You know the one I'm talking about? With the narrow, flat opening? I'm still so glad you enjoyed it!
Of course!!! I should have tried that!! Seems soo obvious now!!! Thanks for the suggestion and thanks again for the awesome ideas!
ReplyDeleteI just finished making mine. I used 2 boxes of 120 crayons to get ALL green. That way if they ran together it didn't turn brown. I also used my hair dryer with the concentrator tool on high heat but low air and it worked great! I added some 3D flowers that you normally use on a wall as well as some 3D butterflies that I got at Michael's. I love it! Thanks for the help!
ReplyDeleteI love the flower idea! I have seen the rainbow melted crayons and thought they were awesome! I want to try it as a science/art experiment with my Kindergartners! I bet they will get a kick out it! Then we can give it to our secretaries for Secretaries Day! Thanks for sharing your great great craftiness! I am for sure going to come back to your blog and check out your ideas in the future!!
ReplyDeleteI wonder if you could seal with varnish or similar after it is done.... I think that would increase durability but also keep critters away from it... Bugs love crayons, and since I am in FL bugs are a serious problem
ReplyDeleteI absolutely LOOOOVE this project! It turned out so well and you've inspired me to make one of my own! I also wanted to tell you that I featured you over at my blog here. Please feel free to grab a featured button if you want!
ReplyDelete-Mel the Crafty Scientist
Great blog! I actually got all the stuff to do the same project a few days ago but I still haven't tried it. Glad I discovered your post - I was planning on using my blowdryer. I'll look into getting an embossing gun tomorrow. Keep up the awesome crafting!
ReplyDeleteI think you could still try to get the background painted blue. Try a wash of water color ofer the entire thing (ok, around the flowers). The wax crayons will resist the waterbased paint.
ReplyDeleteI've tried it with all the rainbow colors, but love your flower idea. I'm inspired!!
This comment has been removed by the author.
ReplyDeleteThis is beautiful and I love the step by step pics and explanation. VERY helpful! I am getting started on my own piece now! thanks for the inspiration!
ReplyDeletestunning! Thanks for sharing. I was looking for a crayon-melt project. This is perfect!
ReplyDeleteThis is so cool. I am going to need to make one of these as well. BTW I like yours more than the artists you saw ;) Thanks for sharing!
ReplyDeleteSaw this on pinterest! I tried it tonight, but decided I didn't like the crayons on the bottom of the canvas. Sooo...I hotglued them to a piece of cardboard, held he board to the edge of the canvas, tilted, and used my hair dryer to melt the wax. Worked beautifully!!! Thanks for the inspiration!
ReplyDeleteNerd. I didn't know you had a blog and I found it through Pinterest. Crazy. You should've asked me for crayons. I have TONS that I need to do something with. Maybe I'll give them all to you and you can make pretty pictures for me k?
ReplyDeleteIm going to do this as a christmas presant for my kiddos teachers'
ReplyDeleteThank you for sharing this! I LOVE the idea of melting... then turning it upsidedown for the flowers! (I saw it on Pinterest, too. :)
ReplyDeleteI love the flowers. I have seen many variations floating around on Pintrest (which I'm not sure if it is making me more artistic or wasting time). I think these will make great baby gifts for my friends in their colors (or multi-color as kids get older)? THANKS for sharing your beautiful craft and your play-by-play details
ReplyDeleteMe encantó la idea, voy a hacer algunos para regalar en Navidad. Thank you.
ReplyDeleteLali (Argentina)
I could see doing it in an under the sea theme! :)
ReplyDeleteEntirely therapeutic I tell you!!!! Thanks!
ReplyDeleteCould you do this and remove the wrappers so it would just be the colors?
ReplyDeleteThis is so awesome, I'm going to have to try it! Thank you for sharing :)
ReplyDeleteHow about a patriotic one that you can change out on holidays. Some red, white and blue crayons and maybe some handmade pinwheels on top (super easy to make)? Or maybe little flags.
ReplyDeleteI just linked to your blog on my blog:
ReplyDeletehttp://theresthisthingcalledgooglemom.com/2012/01/11/pinterest-you-got-pinned/
What a great craft, yours is very well done--Love it!
Hi, love your take on the Etsy piece on top. But google image search is attributing the top piece to you and not JKcreate here: http://www.etsy.com/listing/79331437/meadow It always hurts my stomach a little when a craft blogger puts an Etsy piece side by side with their own, because I know how hard it is to put out a product where the quality in every way has to be so high to actually sell it.
ReplyDeleteOh my god, that is simply perfect! Just got here from Pinterest and this is SO going on my to-do list. Thank you for the detailed tutorial!
ReplyDeleteNew follower!! We (me and my sister) just did the same thing! I wanted one of these for my room, and after seeing the price decide to make one. She peeled the crayon wrappers off, but after reading that you did it with them, we're going to try that next!
ReplyDeleteI am definitely doing this one with my kids. Beautiful and so artistic looking.
ReplyDeleteSuper stuff Lindsey. I did one similar a few months back and everyone love it, but never thought about turning it 180 and popping some flowers on it...neat!
ReplyDeleteHow did you get some lines to be longer than the others?
ReplyDeletehere's another thought...how about putting white labels around the crayons and then wrapping the entire row with thin wire before attaching them to the canvas...there is your picket fence:) I am definately going to try this!
ReplyDelete--markay1126
I totally love that idea, and not sure if you've already tried it yet, but from someone who has done one of these, I would warn that when you start to use the heat source to melt it, the wax turns the paper a different color and looks sort of like an oil splotch. Just a heads up that it may bleed through the white and mess up the look.
DeleteNow, doing it afterwards, or maybe gluing popsicle sticks to the outside with the wire, that might work too!
Hey, I'm in year 12 and am thinking of doing something like this for my major work. I was just woundering if you know of anyone else that has done this style of art? And if you know who thought of this, or originally did it or whatever?
ReplyDeleteThis is awesome! It's so funny, I saw a melted crayon piece in a boutique and immediately had the idea to do a garden scene then within days I saw this on pinterest! Great minds think alike, yeah?
ReplyDeleteAnywho, I am doing this with my class for Mother's Day gifts. I ordered 9x12 flat canvas boards from dickblick.com for less than a buck a piece, and on the crayola website you can order a custom box of 64 with up to 4 colors. it's a little pricey ($10.99 a box) but worth it in the end because you can use every single color in the box and order the number of boxes to equal the exact number of crayons you need with maybe just a few extra. with the 9x12 canvas it's about 26 crayons each. I chose the colors fern, jungle green, macaroni and cheese, and dandilion. I also had all the kids pick 4-7 flowers each out of our class garden and we are pressing them so we can use real dried flowers. Then when all the projects are done I am going to glue ribbon on them to hang them. I am SO excited and can't wait to finish them :)
is there any way i can post this on pinterest??
ReplyDeleteI tried this yesterday using your instructions above and it turned out great! Thank you so much for posting this!
ReplyDeleteNeat idea .....Just love it !!!!!
ReplyDeleteYou should paint the crayons white after to make them look like a fence
ReplyDeleteLove that last idea... we did a couple to see if this would work for a Girl Scout Mother's Day craft. I used all the old broken crayons from the past couple of years...(saved money on the crayons) but lots of them were missing paper so I took off all the paper. Made the crayons all close to the same size. The bad part of that was that the hot glue gun melted the wax a little as I was laying them out. Thanks for sharing your ideas. By the way... love your description of yourself!
ReplyDeleteI like skittles
ReplyDeleteI wonder if you could use the melted crayons to look like fireworks for a July Fourth canvas?
ReplyDeleteJust finished this project for my Son's 2nd grade Teacher thank you gift and it turned out AWESOME!!! Thank you for your wonderful tutorial!!!
ReplyDeleteMade 10 tonight for teacher gifts and love how they came out. 2 things: I think the hard canvas boards over stretched offer a cooler look. Less bandy and more fluid and color filled. The other is I'd like to find my embossing gun and use it. The blow dryer was hard to focus, perhaps the tool would help as previously mentioned. A fun project though! The kids loved learning ROYGBIV!
ReplyDeleteMy daughter made this at a 4H camp this year and turned out wonderful. I'm thinking of doing this ourselves as gifts. Thanks for t he ideas.
ReplyDeleteIf you opt for the dryer, it helps to heat it from the backside of the canvas.... Once it starts to melt, I did from the front and then the back for mire controlled color flow-
ReplyDeletehow did you hang it?
ReplyDeleteA great project for me and my granddaughter she loves to craft.
ReplyDeleteWow! This is such a great idea! I think it's also a great gift for those who love home decors :)
ReplyDeleteLove it and love all the comments after that make it even easier. What I love the most is the way you write your instructions. You have a wonderful way with words!
ReplyDeleteHi Lindsey,
ReplyDeleteI love your crafts and I was thinking, instead of buying flowers, can't you take small pieces of crayon and melt it with the canvas lying flat? Have you ever tried it?
You all are SO fantastic and inspirational as well! As I read your comments, I find myself thinking "This is a craft I HAVE to do!" I then quickly realize I already did it... That's the blond in me. You all have some VERY creative ideas on here that I really would love to try! Although I can't reply to EVERYONE I CAN say, thanks!, so glad it was easy for you, SUCH a good idea to paint the canvas, I would LOVE to see this done like fireworks, and I think it would be AWESOME to use pieces of crayon as flowers!
ReplyDeletewonderful
ReplyDeleteThanks for the idea. I'm making this for an auction item at school. I plan to have the kids put their thumbprints on for the flower petals. Also planning on doing a pale blue background. That was a great idea! Hope it turns out as great as yours!
ReplyDeleteHi,
ReplyDeleteI love your picture. I have done a few myself. I'm wondering: does anyone know if the pictures can bee sealed? I paint acrylic images on my melted wax and usually I seal this.
Could u use Mod Podge as a finishing coat?
ReplyDeleteGreat idea, im wondering if you could use regular art paper especially with a large group since canvis can be rather expensive?
ReplyDeleteMy granddaughter who is visiting us for just one day just now finished this project. She's 10 and was so amazed by the effect. Thank you for helping me entertain her with quality time and something to take back home to NC to remember our short time together. Special memories last a lifetime.
ReplyDeleteLove it yaar!!���� Aaand your article's sooo good! Can't wait to do this..
ReplyDeleteFashion-forward and creatively stimulating, melted crayon art combines color and expression, making it a perfect project for kids. This activity not only fosters artistic skills but also enhances fine motor coordination and cognitive development. For an inspiring collection of Kids Art Supplies, check out Kids Art Supplies at Bobangles. Their range of high-quality crayons, paints, and craft materials ensures that every young artist can explore their creativity in style. Encouraging children to engage in such artistic endeavors promotes self-expression and boosts confidence, making it an essential part of their growth and development.
ReplyDelete