Tuesday, May 7, 2013

Chevron Striped Filing Cabinet

Hello, my dear friends! I bet you thought I forgot, didn't you? Care to know a secret? I almost did! Okay wait, no, I didn't forget... Life has been busy!

Since my last post, I
*changed jobs
*completed my clinical fellowship (I'm a full fledged, fully licensed speech-language pathologist. I'm kind of a big deal... to my parents.)
*bought a house
*decorated a house
*bought a car
*took a nap

I think the nap is the most exciting to me right now... Maybe that's because I finished a long (for me), super productive shift at the hospital and can't wait for a nap! Or bedtime. Or a winter coma. You snicker like I'm joking.... I'm not joking people. Last night, every time I tried to close my eyes, all I could hear was Michael Jackson's "Billie Jean." Imagine it... *eyes shut* "Billie jean is not my lover" *flip over* "she's just a girl who claims that I am the one" *eyes open* "But the kid is not my son" *baaaaaaaaahhhhh!!!!* okay. I'm really not sure how I got on this tangent, so... Hey! Lets just transition to this! Look at what I made!


It started like this... Remember how I said I started a new job and moved? I have several years worth of pediatric therapy materials that needed a home. I needed a filing cabinet. After shopping the internet and finding multiple options (for over $100 a piece), my mom casually mentioned, "Oh yeah! We have one in the garage! We got it at some garage sale for cheap, and quite frankly, your dad will love that you're getting rid of something in the garage." Quick savings of $100? Yes, please! Only problem? Oooooh, it's so ugly! And sterile. And a nasty reminder of work. When I work from home, I don't want to FEEL like I'm working from home. Can I get a witness!?


A couple cans of spray paint, math, google searches of "how to paint chevron stripes" and my idea was born. It actually took me longer to figure out which colors to use than it did to complete the project. First up? Paint the entire cabinet dark blue. 

Next, Math + Google Search. The first site I found was one a fantastic blog of a coo coo mommy. I really think I owe this project to her. I know that I have a bit of a math brain, but it really wasn't bad. Measure your sides, find a number that gives you nice even measurements, and understand chevron stripes don't HAVE to be perfect. Draw it out! The middle set of rectangles on my pad shows the difference between 4 sections and 5 sections on the smaller sides of the cabinet. Even though 5 sections was more work, I knew that'd be the first side people saw, so 5 it must be!
So after deciding on a plan, I very quickly hit my next speed bump. HOW DO YOU MAKE NON-PERMANENT MARKS ON A STINKING DARK BLUE FILING CABINET!?!?!? Pencil? Nope. Stupid pencil. OH! White fabric pencil! No. I felt like that dumb fabric pencil was mocking me. At this point I've put in a movie and I'm a bit brain dead and I catch myself trying to erase invisible pencil marks. Aha! ERASER. See those little lines over there? Eraser marks. I knew there was an ounce or two of genius left in me SOMEWHERE.


Now, the taping. I could thoroughly explain this myself, but why should I when Mommy has already been driven coo coo over it? (See what I did there? Second link. That's how important that blog is to me.) Two important things to remember: One, tape over anything you don't want painted and Two, remember to put your tape on the correct side of your diagonal line! The blue zigs (or are they zags?) should appear a little more narrow than the pained zags. DO NOT USE TAPE SPARINGLY!

If you're like me and tape one night in preparation to spray the second color the next morning, make sure you run your hands along the tape one more time to make sure there aren't pieces sticking up. Those little pieces can screw up the entire project if you're not careful! Also take this time to trim any tape that doesn't follow the nice zig zag pattern you've made.

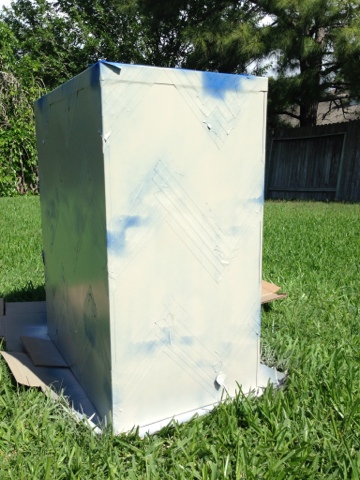
Time to spray, my pretties! Don't waste too much paint on the taped areas, but do make sure to hit the lines well! You will probably need two coats with a bit of drying time in between. Drying time depends on your paint brand and your location. Texas heat means we require all of... 2.4 minutes. No, really it was probably more than 8, less than 10. 

I'm not too proud to say that while I waited for it to dry, I sat in the grass and waited. And stared. I seriously didn't move. Every few seconds I touched the painted area to check for dryness. Texted my Sister-in-Law (YES! THAT IS A LINK ON PURPOSE! Go check out her cooking blog!) the typical "GUESS WHAT I JUST DID!?" message, but then realized I texted too early because I wasn't even sure what I had just done. Then finally I decided that patience IS in fact a virtue... a virtue that will have to be developed some other time and I took that tape off! 


If you'll notice on this picture, I didn't even take the fool tape off all 4 sides before I started taking pictures. Texted the SIL and waited anxiously for the "well done!" (Yes, I DO need validation!) Just to let you know that things don't always run smoothly, I'll have you know that right about this time a HUGE storm cloud comes rolling in. I rushed the cabinet inside as quickly as I could just in time to see clear skies as the cloud passed over. Seriously, Texas? First you give us a high of 69 in MAY and now you're giving us faux-clouds? That's cruel, Texas... yet, well played.


You'd be surprised how much tape you use. See that floor tile? Yeah. I think those are 12-14 inch tiles. Heh. I told you not to use sparingly! 


Yeah, you could say I'm kind of pleased with myself. But here's the real test: Was it worth it?

Cost: 
Filing cabinet: Depending on how you shop, it could vary. I did see one for around $40 at wal-mart the other day about this size. 
Paint: (2 cans of spray paint in 2 different colors) ~$4 each
Painters tape: ~$4
Total cost: $52(ish)

Time: 
Initial painting: 30 minutes overall for both coats
Math and taping: Probably around 3 hours, mainly because I was watching a movie and was easily distracted
Secondary painting and tape removal: 30 minutes? 
Time to sit and stare at your work and realized "By George, it worked and it wasn't even that difficult!": 10 minutes, give or take an hour
Total time: Around 4 hours, but perhaps best done over an evening and a morning

Level of Ease: Adult
Sorry, Kiddos. Unless you're awesome at tape tearing math, this is a project probably best left for the older crew. But if mom wants to let you work the spray paint, well then grab yourself a mask (and mom, pick up an extra can of spray paint to be safe) and knock yourself out! 

Not literally. Please, do not knock yourself out. I will not be held liable for any traumatic brain injuries. I just can't handle that. 

Worth it? To me, yes. I needed a cute place to file away boxes and boxes of materials, and I ended up with a one of a kind cabinet. Instead of spending $100 on a cutesy Target cabinet, I spent $8 on two cans of spray paint. THAT I can handle. 

Your turn! What will you paint? What will you chevron-ize? And while you're at it, what do you wish my NEXT project to be? Want a folder game you can print out for your little ones? Something on canvas? Something in the kitchen? Think very hard on these things, 'cause I'm BACK folks! This will not be our last farewell! 

Happy Crafting my friends,
lindsey daniella

Saturday, October 15, 2011

Pretty Fantastic Pumpkin


I work long hours. Monday through Thursday I am at work from 8 am to 7 pm, supposing I leave as soon as the day is finished (which I never do). Therefore, when it comes time for holiday decorating, I have this urge to decorate MY OFFICE. Forget the house... that's just the place I sleep. As I think of decorations, no holiday would be complete without a pumpkin. I enjoy the idea of a carved pumpkin, but I really don't want the bugs and smell that comes with that. I came across a picture of a pumpkin with rhinestones on Better Homes and Gardens and thought it was perfect. The only problem? Rhinestones can be expensive! On top of that, you pay 5-6 dollars for each pack of rhinestones that will be thrown away. I don't know about you, but that hurts my heart (and my pocketbook) a little! That's where I come in. Can I do it cheaper? Can I make it look just as good? Challenge: Accepted.


Recipe:

One perfect or imperfect pumpkin. (I love, love, love pumpkins of all colors, shapes, and sizes. For me to pick just one? TORTURE.)


T-Shirt Paint. Tulip is probably one of the most popular brands, but any paint will do. The reason I used T-Shirt paint is because of the handy little nozzle that is perfect for making the little paint beads. I really loved the idea of using the glow in the dark paint, but instead chose a larger bottle of glossy black paint to most closely imitate the rhinestones. And can you guess where I bought it? Hobby Lobby!


And now, the fun part! Swirl 'till your heart's content! Initially, I used a yellow highlighter to put a pattern on the pumpkin so that I knew exactly where to dot. It was easy to see in the light but invisible as soon as the light wasn't directly hitting it. After the initial swirls, I did the rest free hand. I've had lots of practice... Just check out all my notes from Music Lit sophomore year of college. "Bach, blah blah blah. SWIRL. Vivaldi. Seasons. Listened. Try not to dance. SWIRL. Teacher, funny. SWIRL. Test next week... on WHAT? We haven't done anything! SWIRL." Surprisingly, I got an A. I digress, yet again! I began with major swirls all over the pumpkin, then finished with smaller swirls branching off from the major swirls.


In this picture, you can see the original swirl that you see above and how other swirls came off of it later.


Another side of the same pumpkin.

 Oh, pumpkin... I do love you!

Cost: 
Pumpkin: $4.00 at the grocery store
Paint: $3.95 - (20% off coupon) = $3.16 (And a TON of paint left over.)
Total price: $7.16

Time: around 30 minutes. Not counting hand cramps. No, not joking. 

I approve! Because of the fine motor dexterity needed, it's probably most appropriate for upper elementary and up.

Now, here's the other catch. I put the pumpkin on my floorboard's rubber mats to take it to work and drove like normal. (Read: I drove like a mad woman in rush hour traffic.) When I got there, there were dots EVERYWHERE. In the seat, on the floor, on the other side of the car... EVERYWHERE. Well, everywhere but the pumpkin. I didn't even bother taking it out once I got to the office. I brought it home and got to start all over! Why is this good? Because this is a project that is IMPOSSIBLE to screw up. In fact, there were quite a few swirls I didn't like so I popped them off and fixed it. Does it get much better than that?

YES. It does! I didn't upload a picture of this so you'll have to use your imagination. I took a smaller pumpkin and did our family's monogram and, you guessed it, SWIRLS. I think it looks pretty awesome. If I had more pumpkins, I might just spell out our entire last name. How's that for cheap decorating?

Okay, your turn! What will you do? Spider webs? Ghosts? Witch hats? Pop off the Halloween dots and paint leaves in red and brown?

Happy crafting, my dear friends!

lindsey daniella

Monday, September 5, 2011

Melted Crayon Art

When I saw this on Pinterest, my first thought was "That. Is. Awesome." My second thought was "This would look fantastic in my office at work." (I work in pediatrics. Crayons, much less MELTED crayons is completely Peds.) After clicking on the link, which led me to an ETSY page, I realized JKCreate was charging anywhere from $40-$75 for his/her artwork. What!? I can see spending money for artwork, but not when I'm crafty AND it looks like a blast to recreate the artwork! Okay. I can do this. And hopefully, for MUCH cheaper than $40.


Materials:

One Canvas. For this project I found a 10"X20" which was 7.99 at Hobby Lobby, 30% off! One Canvas = 5.59!

Crayons. I went to Target and bought 2 boxes of 64 count crayolas so that I could get several shades of green. I think it was around $4 a box. I could have found this cheaper, but I was in the mood to craft... not shop :)


First, I pulled out all the greens and dark yellows. It didn't look like there was quite enough, so I also pulled out a few browns. Hey, this is Texas, y'all. What's nature without a bit of dead grass? I lined it all up on the canvas until I was satisfied and got to work gluing. I used Aleene's Clear Gel Tacky Glue since I knew it dried clear. That, and because it's my Craft Room Staple that you can get from Walmart for a couple bucks. One strip of glue, One crayon, stick and repeat. 26 crayons, 10 minutes tops.


Aaaaand let it sit for about 30 minutes. You know, this is the WORST time to decide this, but I'm not sure that I like the crayola labels facing out on every crayon. Oh well. That Aleene's is SERIOUS glue and you DON'T want to mess that up. What's done is done... So let's move on.
Armed with an embossing gun... (OR you can try a hairdryer)


Oh my goodness, it's working! I mean, of course it's working! The crayon wrapper turns a little darker as the wax melts, but don't let that freak you out... and don't let it distract you!


And there you go. I kept the canvas tilted at about a 15 degree angle and twisted a little bit as it dripped to get some wavy lines. Be VERY careful as you use the embossing gun or hairdryer. The liquid wax has a tendency to seriously fly all over the place. You can tell that in the finished, finished pictures below.


Finally, the flowers. I went to Hobby Lobby for the flowers, but they closed at 3:30 because of Labor Day. Next stop: JoAnn's. Their flower selection was definitely not as good! I was hoping for some that were colorful, silk-like, with a jewel in the middle. JoAnn's had NOTHING of the sort, but I did find these Daisy heads for around $4. Peel them off, stick them on, and admire your handiwork!

All right, folks, the damage for today's craft:

Canvas: ~ $6 (let's round up)
Crayons: ~$8
Flowers: ~$4
Aileen's Craft glue: ~$2

Whole Project: Around $2 for the one. This is another one of those crafts that get cheaper the more you make since you have left over crayons, flowers, and glue. Cheaper than JKCreate's version? I think so! Still appreciated by my Peds patients and coworkers? I think so! Happy camper? aaaaaaabsolutely.

Time: ~ 1 hour, start to finish
I suggest doing this kind of project while watching a movie or over lunch. Eat while letting the glue set, then the project feels like it only took 20 minutes. 

Level of Ease: Kid + Adult
I think it's the PERFECT craft to do with kids. Adult operate the glue, kid help you pick out crayons and lay them down. Depending on the age, they might even enjoy making it melt. If you're worried, do it over cardboard or outside. It's truly mesmerizing to watch the crayons melt and meld. I can't WAIT to do it again!

YOUR TURN!
What would you change? What other colors would you use, and would you try to make scenes with it? I had the suggestion of putting a pale blue wash over the canvas with paint before melting, and I wish I would have thought about that sooner!

Happy Crafting my friends,
lindsey daniella

Sunday, September 4, 2011

Pinterest Dry Erase Board

The first time I saw this project, I was on pinterest.com and it was love at first sight. I already write on every glass surface in my home from mirrors to windows. Now to frame scrapbook paper for my own board? Yes, please! But here's the thing... My moods change about as quickly as the weather. Wait. The weather in Texas is currently hot and hotter, so perhaps that's a bad analogy. I digress. My moods change, as do my preferences in design styles. Why not cut several papers and stack them behind one another so I can change the papers as my mood sees fit? 


So the starter: The frames. I went to several different places to find a preferred frame at a preferred price. Ross's selection was well picked over, otherwise that would have been a good choice. The 8X10 frames were around 8.99. I also tried Marshall's, Hobby Lobby, Walmart, and Target. In the end, I picked these frames from Garden Ridge Pottery for 5.99 (left) and 7.99 (right). 
Add a bit of Scrapbook paper... For the life of me, I don't know why but I bought the 12X12 scrapbook paper instead of the 8.5X11. Regardless, I liked my selections. Most pieces were marked $.59. Some were marked 6/$1.00. All were purchased at Hobby Lobby when they were marked 50% off. Keeping track yet? 30 cents per page at its most expensive. LOVE. I cut each piece to fit in the frame with scissors because THIS scatterbrained girl has packed her paper cutter. (Did I mention I'm moving?) 

Take off back, clean the glass, insert paper (for the gifts I just have one, for mine I have Valentine's day, Christmas, Halloween, Thanksgiving, and every day covered), replace the back, attach a wipe erase marker to the top of the frame with a piece of velcro, and SMILE at your handiwork. Last step? Grab a marker and write your gift message on the glass to forgo the card.


Okay, so let's assess the damage:

Frame: ~ $6.00
Paper: ~$.30
Markers: ~$3.00 for a 3-4 pack
Velcro: (a craft room staple!) ~$3.00 for a small pack

Whole project: $12.30 for one. 
If you do 3, $24.90 which figures out to $8.30 each. 

Time: ~ 10 minutes per frame.  

Level of ease: Kid + Adult. The Adult will need to help with the glass and, depending on the way the back fastens on, the back of the frame. Of course, the cutting of the paper too.

NOT BAD! It's a great gift to wrap up and keep on hand for those forgotten birthdays. Perhaps I'll wrap a few extra in December to put under the tree... Just in case someone gives me a present and I totally forgot to get them one. Then I get to pull the "I've got YOUR present right here!"Yes... I think that's what I'll do. 
YOUR turn. What do you think? Will you try it? What will  you change? 

lindsey daniella

Saturday, August 27, 2011

Introductions all around

In my home, "Lindsey Daniella did it!" was a phrase I heard quite often.
"Who left the door open!?"
 "Lindsey Daniella did it!"
"Who made the mess in the kitchen!?"
"Lindsey Daniella did it!"
"Who let the crayon melt in the backseat!?"
"Lindsey Daniella did it!"
"Who pressed the pencil down so hard the word 'galaxy' is forever engraved in the kitchen table!?"
"Lindsey Daniella did it!"
"What is that smell!?"
"Linds..." Well, that wasn't always me. I'm just sayin'.

Besides, you get the point.

Add 5... 10... 20 years and all of the sudden, I LOVE hearing the phrase "Lindsey Daniella did it!"

"Who made the cake?"
"Lindsey Daniella did it!"

"Who made this quilt?"
"Lindsey Daniella did it!"

"Who put this together?"
"Lindsey Daniella did it!"

Sewing, cooking, stamping, crafting... I love it all. But I HATE having these amazing craft ideas and finding out that either 1, takes too long or 2, it is WAY too expensive. Oh, and what about all those crafty girls that recommend you use these "objects laying around the home" like 300 year old antique mirrors or that perfect frame with all the classy swirls or that chair that is just begging to be re-purposed? Come ON, Martha! If I had a 300 year old antique mirror, I wouldn't be looking for craft ideas to make something that LOOKS like a 300 year old antique mirror! And I don't know which Goodwills YOU'RE going to, but MY Goodwill doesn't have items like THAT. Well, perhaps they do, but I don't have time to go to 5 different locations, 7 days a week.

Here's the part where I announce my goal. I'm going to do these projects I see online, or the ones I think of myself. As best I can, I'm going to report on the time. I'm going to report on cost. I'm going to report on frustration level. I'm going to report on the smile on the face of the person who receives the gift. And you? You're going to tell me if you love it. You're going to report on the same project if you try it. Easy enough, right?

So, my dear friends, grab a cup of tea, a hot glue gun, a jar of allspice, and your computer... let's get started.

lindsey daniella